by David “Clean” Berryman, 2nd AC

A lot of new ACs treat camera cart setup like it’s a personal expression. Their shelves are packed full, everything has a designated spot, and the whole thing looks great in a photo. Then they get on set, someone asks for a build, and there’s nowhere to actually work.
Your Camera Cart Setup isn’t about aesthetics. It’s about workflow. And if you’re newer to the industry, some of what I’m about to say is going to feel backwards. That’s the point.
Here’s what I do for a Camera Cart Setup, and more importantly, why.
1. The Top Shelf Is a Workspace, Not a Storage Shelf
This is the one that confuses people the most. New ACs want to fill the top shelf. Lenses lined up, magazines staged, accessories organized. Looks clean. Doesn’t work.
The top shelf is yer primary work surface. When a 1st AC is building a camera, they need room to set things down, flip parts around, and move fast. If that surface is already full, every build becomes a shuffle. You’re moving things to make room, then moving them back. On a tight turnaround, that costs you time you don’t have.
Keep the top shelf open. Leave staging space. The camera docks there, and everything happening around that camera needs room to breathe. It feels like wasted real estate until the day you’re doing a flip job between setups and the entire crew is watching you work. Then it makes complete sense.
2. Get Yer Heads Off the Top Shelf
Here’s the other thing that trips people up: putting the O’Connor or gear head directly on the top shelf. The logic seems fine, it’s the biggest, heaviest piece, put it where it’s most stable. But now it’s taking up half yer workspace.
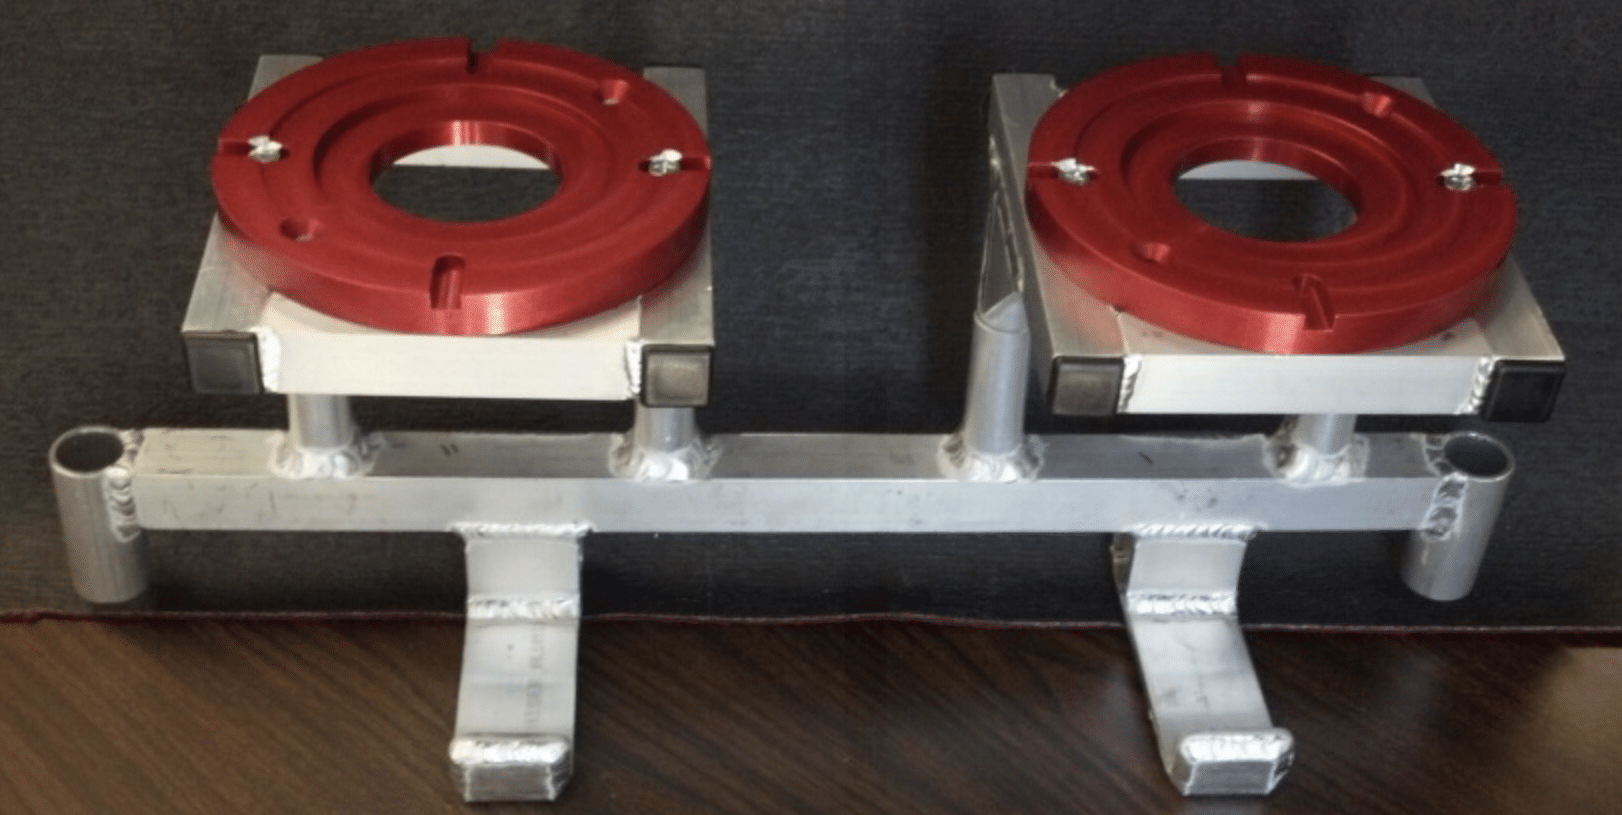
The fix is a double Mitchell plate mounted to the side or lower section of the camera cart. A double Mitchell plate gives you two Mitchell bowl mounting points, so you can hang both the O’Connor and the gear head off the camera cart body and completely off the top shelf. The heads are still secure, still accessible, and now your primary work surface is actually free to use.
It’s one of those things experienced ACs do automatically that never gets explained to anyone new. Now you know.
3. The QRB, Spinner, and Riser, Order and Why
Once the top shelf is clear and the heads are housed elsewhere, this is the stack that goes in the center of that shelf. Order matters.
Middle: Spinner Plate
The Spinner goes between the camera cart (unless you’re running without a Riser) and the QRB. It lets you rotate the docked camera 360° so you can always access the side you need, lens release, accessory port, whatever. This sounds like a nice-to-have until you’re on set trying to reach the far side of an ALEXA 35 with a full accessory build on it. Then it’s non-negotiable.
Top: Quick Release Base
The QRB is the top of the stack and the thing that matters most. This is your camera dock. A good QRB lets you pull and replace the camera in seconds, no tools, no fumbling, no asking for quiet on set while you’re trying to re-seat a plate. The Touch & Go Plate is the plate that rides with the camera body; the QRB is the receiver that stays on the camera cart. Together they’re the fastest, most reliable quick-dock system in the business.
Bottom: Riser
The Riser mounts directly to the camera cart’s Mitchell plate holes and elevates the whole stack. Not every setup needs one, but if you’re running a larger camera body with a matte box or a tall monitor configuration, without the Riser you’ll be trying to dock a camera that keeps hitting the shelf edge or overhanging in a way that makes the whole thing unstable. If you do buy one, put it down first.
That full stack, Riser, Spinner, QRB, is what we sell as the Combo: Cart Pro. It’s the complete dock setup, bundled, and it saves you money versus buying each piece separately.
4. Accessories That Actually Earn Their Spot
Once the dock is sorted, the rest of the camera cart is about the accessories that make the day easier. Here’s what I consider non-negotiable:
Wheel Chocks
This one sounds trivial until yer camera cart rolls into a light stand. Or rolls off a curb cut. Or slowly drifts toward a monitor during a quiet take. Wheel chocks hold the camera cart in place without putting drag on yer wheels like a brake does. They take two seconds to kick into place and they will save yer life (or at least yer embarrassment) eventually. Comes in 8″ and 10″ depending on yer wheel size.
Yaeger Cart Pins
If you’re running a monitor arm, a Preston hand unit holder, or any accessory that mounts to a pin on the cart, Yaeger Cart Pins are what you want those accessories sitting in. They’re machined, they fit right, and they don’t wobble. The monitor that wobbles while you’re pulling focus is a distraction you don’t need.
Backstage Stand Hooks
Sticks go on the cart. That’s just how it works. Stand hooks are what keep them from sliding off or banging around every time you move. These fold up when not in use, fold down when you need to hang a stand, and they’re built to take the weight without flexing. If you’re on a Backstage cart, these are the right fit.
Umbrella Pin
Yer cart is gonna have a sun umbrella on it. Every cart does, eventually. An umbrella pin gives you a dedicated mount point instead of just jamming it into whatever hole is handy. Not glamorous. Necessary.
5. Saddle Bags in your Camera Cart Setup
Yer gonna need some saddle bags or some sort of soft bag at the handles. You’ll keep your cart cover, ratchet strap, wheel chock, rags, etc in here. Keep it practical, don’t let them become a junk drawer, only active small gear.
6. Drawers, to be or not to be for your Camera Cart Setup
Speaking of drawers, some people add a drawer to their cart for more delicate or valuable items. I’m not a fan personally for 2 reasons. 1 it gets in the way of taller cases so it limits what you can put on the bottom shelf. 2 when you break down your cart, you now have a big hunky drawer hanging off. The drawer does offer some benefits so you’ll have to decide for yourself what’s more important to you.
7. The Umbrella
This is a must have almost anywhere on the planet. You will always want some shade to keep yourself & the gear cool. The sportbrella is the most common. They’re about 5′ in diameter and some models are tiltable.
Almost Universal Umbrella Pin, clamps onto any cart rail (Backstage, Yaeger, Magliner, Inovativ, Camera Jimmy’s). my preference as it can be centered to the cart providing the most coverage.
Yaeger Umbreall Pin goes in the corners. solid mount but only half the cart gets covered.
Backstage Cart Umbrella Pin, for Backstage carts specifically. also a corner mount.
8. The Ratchet Mistake That Destroys QRBs
This one I feel strongly about, because I’ve personally repaired a lot of QRBs that were damaged exactly this way.
When you’re loading camera carts into the truck at the end of the day, it’s common to ratchet them together to keep them from rolling around during transport. I get it, it works, it’s fast, and it keeps things from shifting. The problem is how they usually end up positioned.
When two carts are ratcheted together, the sticks (tripod legs) on one cart are often facing toward the other cart. Those legs are stiff, pointed, and unforgiving. When the carts settle, or when the truck hits a bump, those legs press directly into whatever is at the same height on the adjacent cart. More often than not, that’s the QRB.
The sticks make contact with the safety release pin and trigger mechanism on the QRB. Over time (sometimes not even that much time), that repeated pressure bends the pin, crushes the trigger housing, and compromises the lock integrity of the whole unit. The QRB still looks fine from the outside. But the mechanism is now inconsistent. Sometimes it locks fully. Sometimes it doesn’t.
That’s how cameras get dropped.
My strong advice: don’t ratchet carts together with sticks facing adjacent gear. Orient the carts so the sticks face outward, or reposition them before ratcheting. If you’re short on time and space in the truck, at minimum make sure the sticks aren’t lined up to press into the QRB or any other precision hardware on the neighboring cart.
It’s an easy habit to build. It’s a much harder (and more expensive) problem to fix after the fact. Our Quick Release Baseis machined to last, but it’s not invincible when you’re using it as a ratchet anchor.
8. Build for the Job, Not the Photo
There’s no one-size-fits-all camera cart setup. Episodic TV looks different from a feature. A show with a two-camera package has different cart needs than a single-camera indie. If you’re doing a lot of run-and-gun, your top shelf priorities shift.
The stuff in this guide is the foundation, the principles that hold across almost any job. Open workspace. Heads off the shelf. QRB, Spinner, Riser in the right order. The right accessories, not just a lot of accessories. And protecting yer gear during transport.
Start with that, then adapt for the show.
If you’re building out a cart setup and want to grab everything at once, the Combo: Cart Pro is the fastest way to get the core dock setup handled, QRB, Touch & Go Plate, Spinner, and Riser, all machined in the USA, all designed to work together.
Shop the full cart accessories line →
David “Clean” Berryman is a 2nd AC based in Texas with credits across film and television. He founded Clean’s Camera Support in 2012 to build the gear he actually needed on set.